- Ngăn ngừa thất thoát dữ liệu (DLP) và quản lý mối đe dọa nội gián đều là ưu tiên hàng đầu của các nhà lãnh đạo bảo mật để bảo vệ dữ liệu của công ty. Và, trong khi thực sự có hàng nghìn mối đe dọa - từ thiết bị, ứng dụng chia sẻ tệp tin đến bảo mật vật lý - thì email là mối đe dọa mà các nhà lãnh đạo bảo mật vectơ đe dọa quan tâm nhất trong việc bảo vệ.
- Nó có ý nghĩa, đặc biệt là với môi trường làm việc từ xa. Theo dữ liệu của nền tảng Tessian, nhân viên gửi gần 400 email mỗi tháng. Khi bạn nghĩ về tổng số cho một tổ chức có hơn 1.000 nhân viên, đó là 400.000 email , nhiều email trong số đó chứa dữ liệu nhạy cảm. Đó là 400.000 cơ hội cho một vi phạm dữ liệu.
Giải pháp phòng chống thất thoát dữ liệu email: Data Loss Prevention
1.Cấu hình Trên Mail Server ( O365-Mail Exchange)
Tham khảo link:
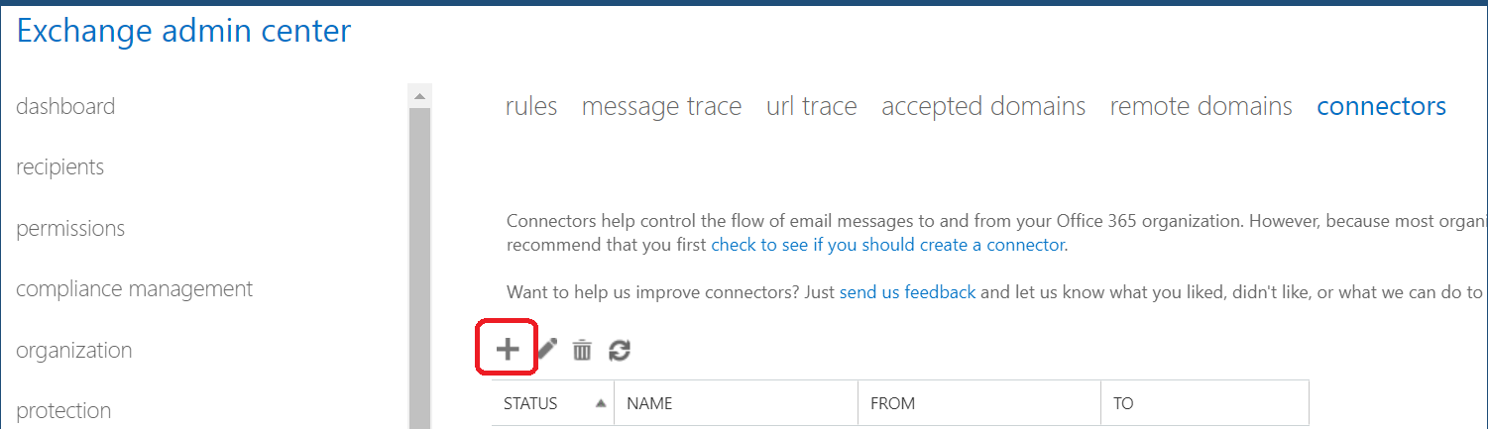
Step 1: Connectors
To integrate Harmony Email & Office with Microsoft 365:
- In Office 365 Exchange Admin Center (classic portal), go to Mail flow > connectors.
- Click the + button to create a new connector.
- To configure the Check Point DLP inbound connector:
₋From - select Office 365
₋To - select Partner organization
₋Click Next.
₋Name - enter Check-Point DLP Outbound.
₋Description - enter Check-Point DLP Outbound.
₋What do you want to do after the connector is saved? - select Turn in on.
₋Click Next.
₋When do you want to use this connector? - select Only when I have a transport rule set up that redirects messages to this connector.
₋Click OK and then click Next.
₋Under How do you want to route email messages? - select Route email through these smart hosts
₋Click the + icon to add a smart host, and enter the host domain name: mta-outgoing.iaas.checkpoint.com
₋Click Save and then click Next.
₋Under How should Office 365 connect to your partner organization's email server? - select Always use Transport Layer Security (TLS) to secure the connection.
₋Connect only if the recipient's email server certificate matches this criteria - select Any digital certificate, including self-signed certificates.
₋Click Next. Then click Next again.
₋Click the + icon and enter this email address: [email protected]
₋Click Validate.
₋Notice that 'Check connectivity' succeeded and 'Send test email' failed. Click Save.
₋Click Yes on the warning message.
Make sure that the two connectors are created:
₋From - select Your organization's email server.
₋To - select Office 365.
₋Click Next.
₋Name - enter Check-Point DLP Inbound
₋Description - enter Check-Point DLP Inbound
₋What do you want to do after the connector is saved?, select Turn in on.
₋Click Next.
₋How do you want to identify the partner organization - select By verifying that the IP address of the sending server matches one of these IP addresses that belong to your organization.
₋Click the + icon.
₋Enter the IP addresses: 34.241.84.80, 54.155.100.84
₋Click OK and then click Next.
₋Click Save.
To configure the Check Point DLP outbound connector:

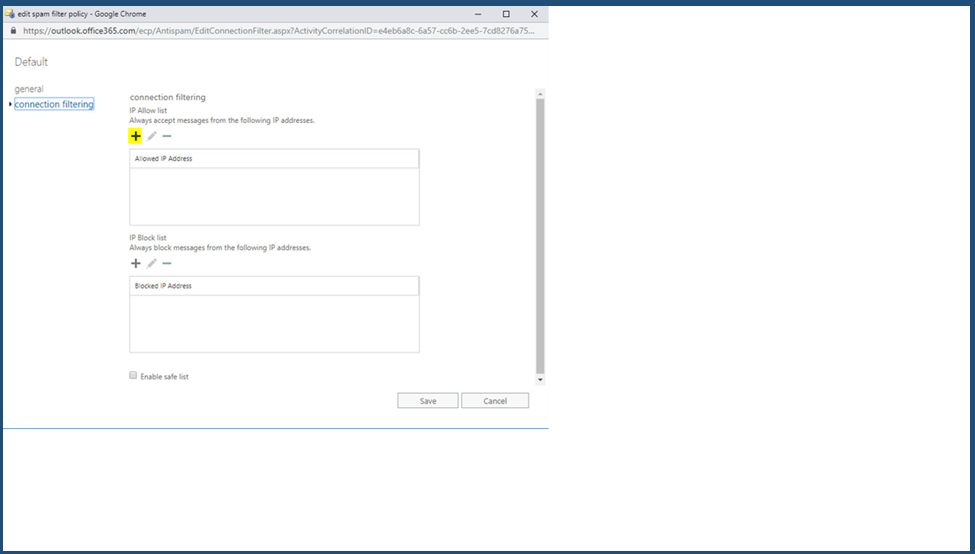
Step 2: Connection Filter
₋In this step, you update the Connection Filter to whitelist emails from Check Point.
₋In the Exchange admin center (classic portal), go to Protection > Connection filter.
₋Click the icon to edit the default rule.
₋Under Connection filtering > IP Allow list, click the + icon.
₋Under add allowed IP address, enter these IP addresses 34.241.84.80, 54.155.100.84
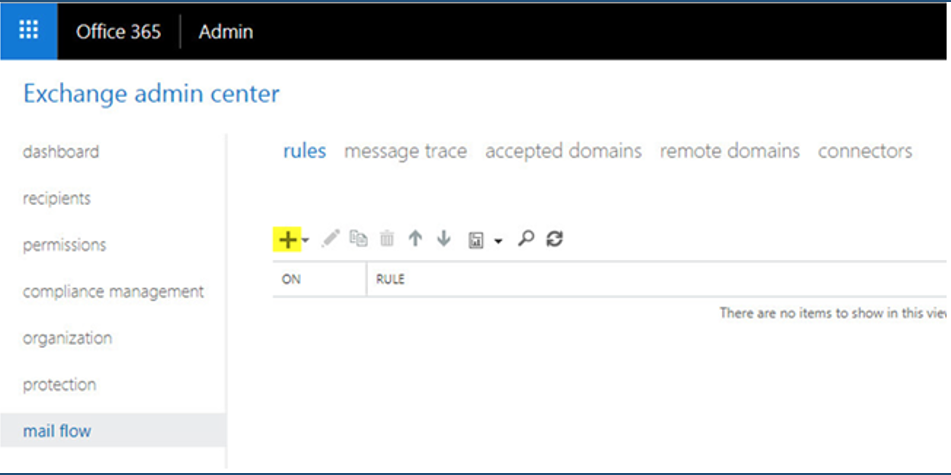
Step 3: Transport Rule
In this step, you create transport rule that will transfer the outbound email through Check Point.
Create the Check Point DLP Inspection rule:
In the Exchange admin center, go to Mail flow > Rules.
Click the + icon to add a rule.
₋Name - enter Check-Point DLP Inspection.
₋Apply this rule if…, add two conditions:
- The first condition - The sender is located Inside the organization
- The second condition - The recipient is located Outside the organization
- To add one more condition, specify the groups that must be protected. In normal scenarios, this would be all users.
₋ Do the following… add two actions:
- First action: Modify the message properties -> Set a message header, header name: 'X-CMTA-ACCOUNT-ID', header value: copy Client ID value from: Harmony Email & Office portal -> Settings -> Deployment: under Outbound email, click on Learn more.
- Second action: Use the following connector, select Check-Point DLP Outbound
₋Except if… - add the Sender’s IP address is in the range: 54.155.100.84, 34.241.84.80
₋Note: if you have other inbound connectors with IP addresses, add their IP addresses to this list.
₋Set the priority to 0
₋Select the checkbox for Stop processing more rules.
₋Click Save
2.Cấu hình Trên Harmony Dashboard
Trên Portal Harmony Email & Office -> Chọn kết nối với Office 365
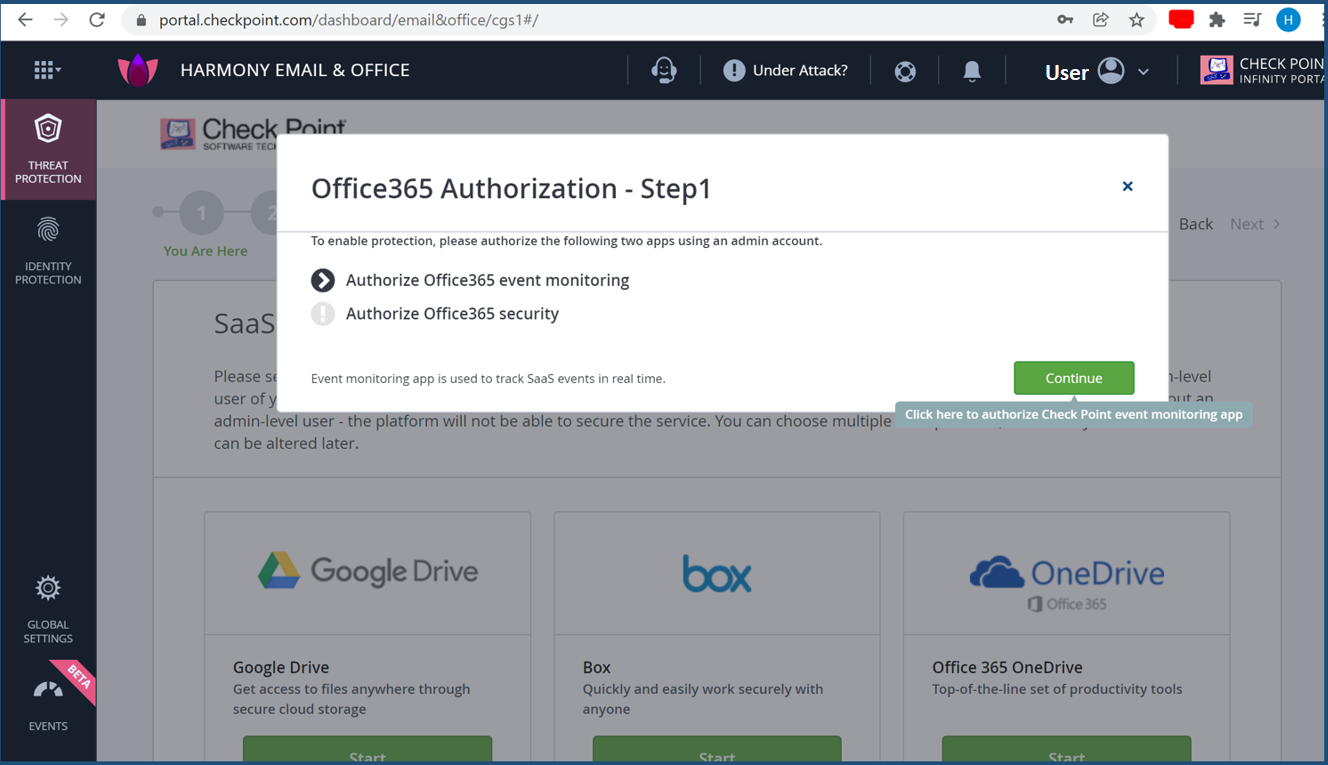
Harmony sẽ cần Account Admin của Office 365 ->Sau khi cấp quyền -> Chọn Group Mail muốn quản lý

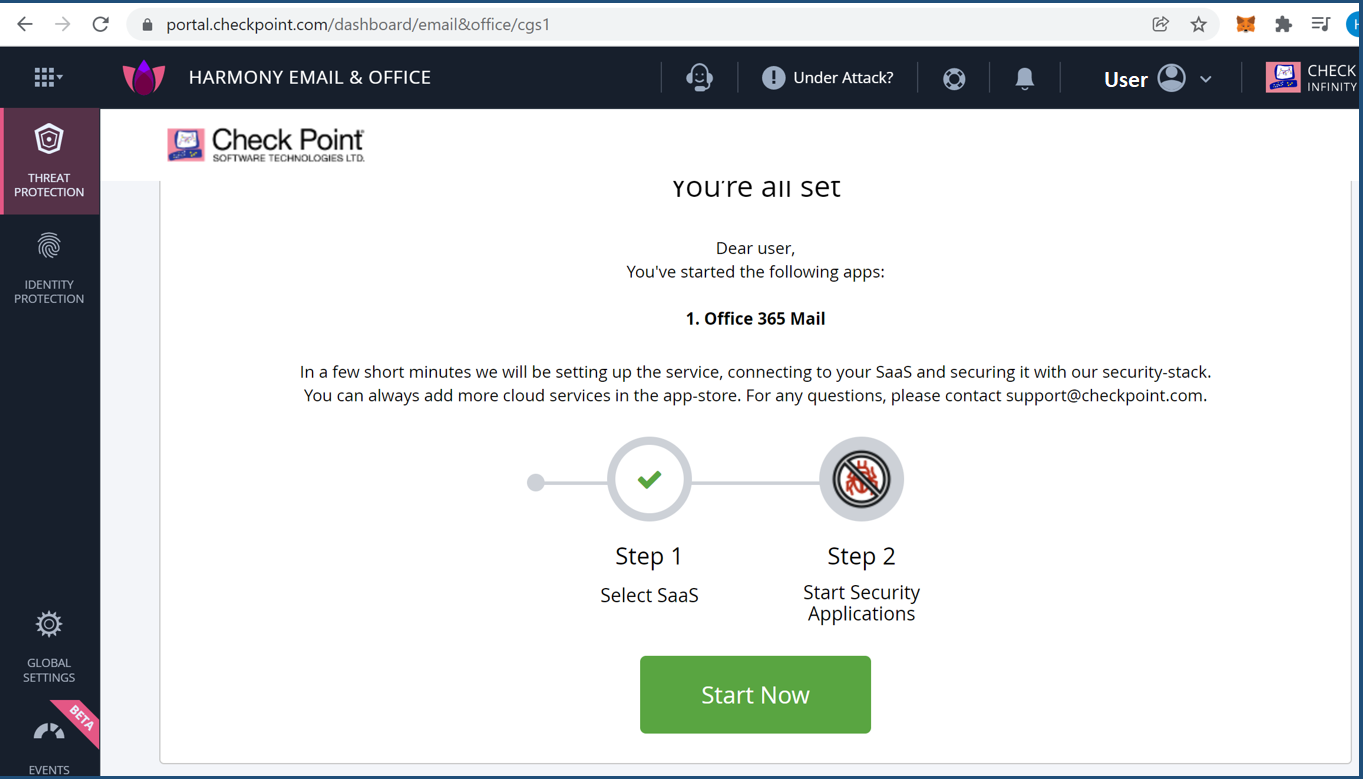
Chọn Start Now để kết nối
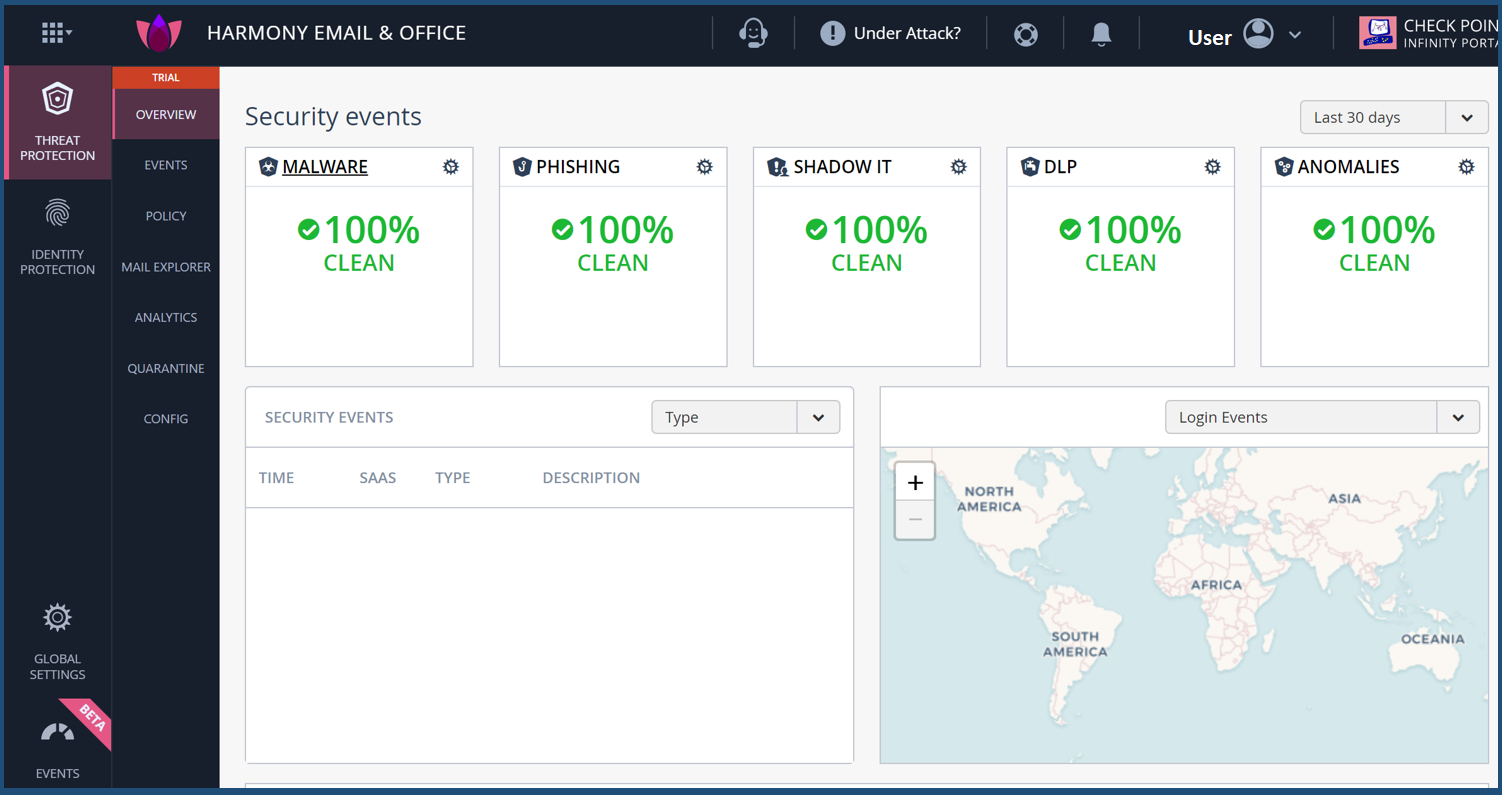
Sau khi kết nối thành công > Dashboard hiển thị:
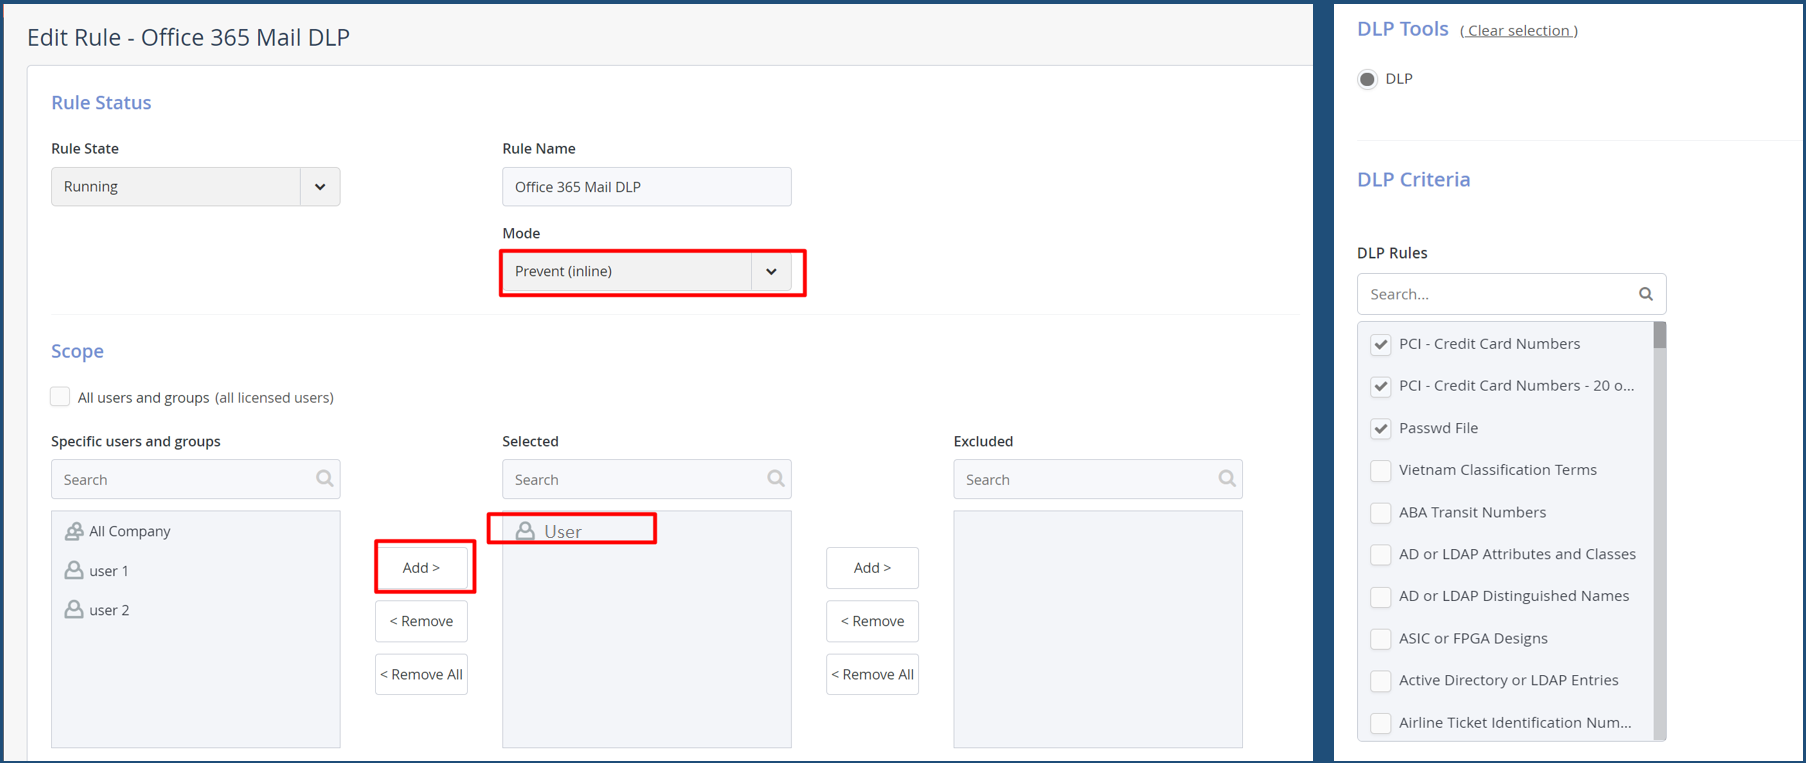
Tạo Policy cho Mail Server chặn gửi các nội dung nhạy cảm ra ngoài
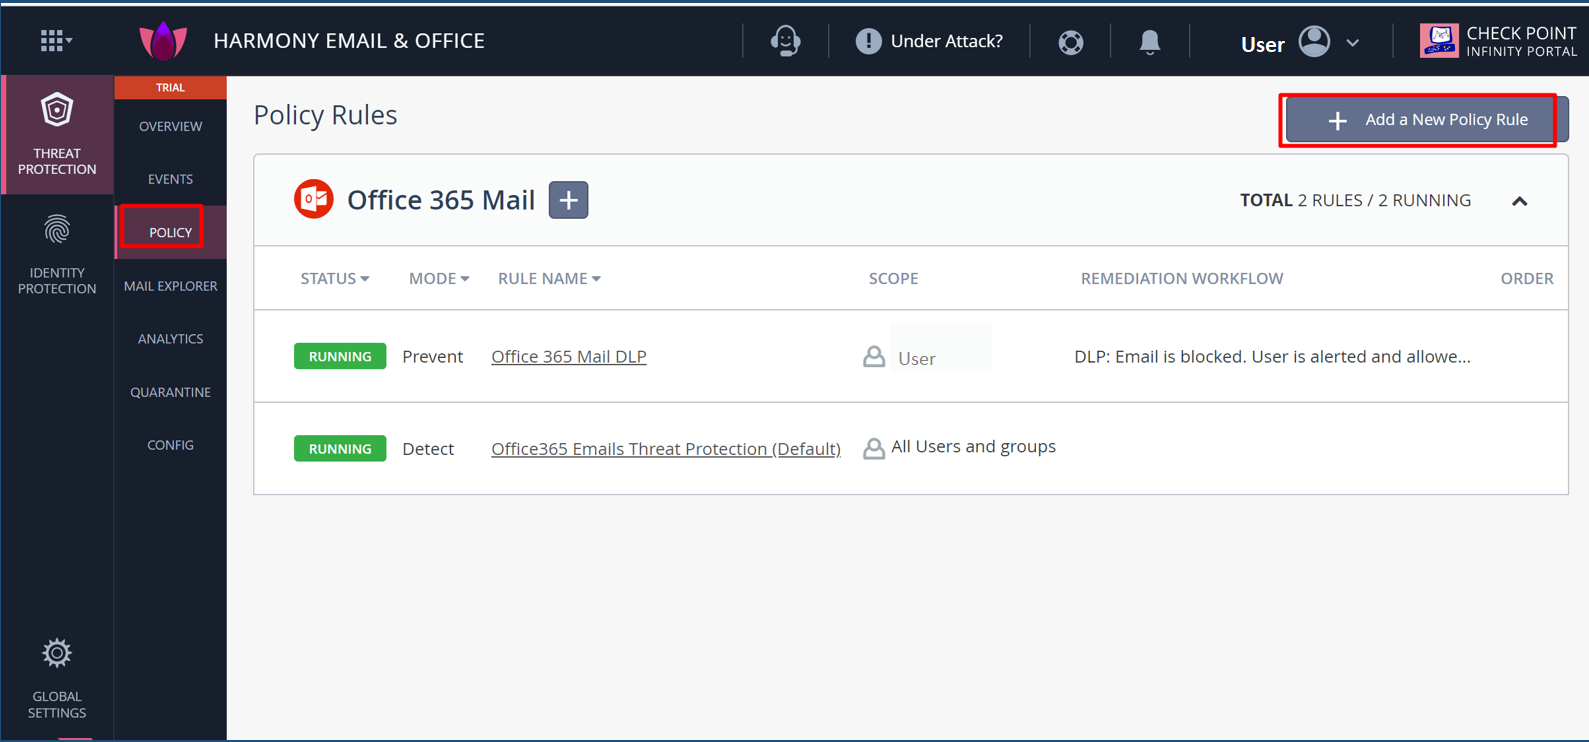
Tạo Policy cho Mail Server chặn gửi các nội dung nhạy cảm ra ngoài (Password, Credit Card,…)
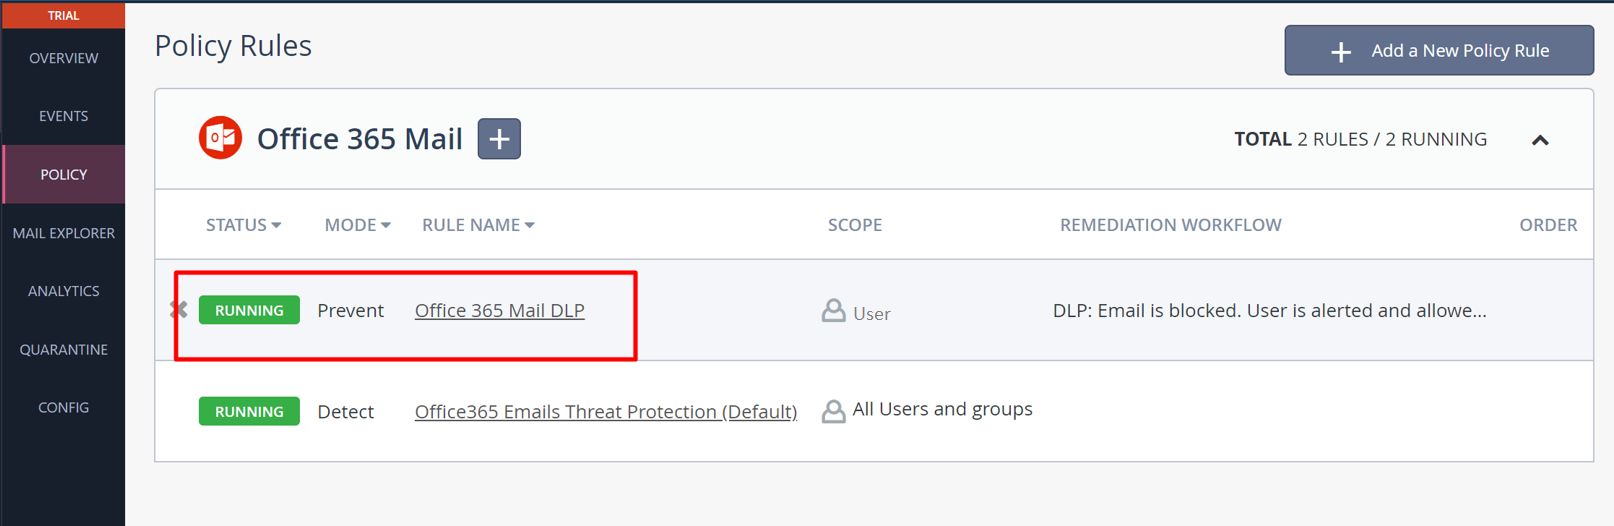
Verify Rule đã được tạo thành công và status: Running
Trên đây là chia sẻ về Cài đặt triển khai Data Loss Prevention (Mail) trên Firewall CheckPoint
Trong quá trình thực hiện, nếu gặp bất kỳ khó khăn nào, bạn vui lòng liên hệ các kỹ thuật viên của CloudX để được nhanh chóng hỗ trợ. Nếu thấy bài viết này hữu ích hãy subscribe để theo dõi những thông tin mới nhất từ CloudX nhé. Chúc các bạn thành công!
Hệ sinh thái của CloudX:
- Tư vấn miễn phí hệ thống CNTT cho doanh nghiệp
- Cloud Server, Cloud VPS, Hosting
- Xmail - Email tên miền doanh nghiệp
- Server vật lý, cho thuê chỗ đặt
- Dịch vụ quản trị máy chủ, Outsource CNTT, quản trị hệ thống mạng doanh nghiệp, IT Support
- Miễn phí cài đặt, vận hành quản trị phần mềm trường học ảo Canvas LMS
- Triển khai, quản trị Firewall cho doanh nghiệp
Xin vui lòng liên hệ Hotline/Zalo: 0983.357.585 Mr.Cường để được tư vấn tận tình.